- Title: Secure Pull Printing with QR Codes and National eID Cards: A Software-oriented Design and an Open-source Implementation
- Authors: Matteo Leonelli, Umberto Morelli, Silvio Ranise, Giada Sciarretta
- DOI: 10.1145/3422337.3447847
- Acceptance News: Link
Abstract
With more systems becoming digitized, enterprises are adopting cloud technologies and outsourcing non-critical services to reduce the pressure on IT departments. In this process, it is crucial to achieving the right balance between costs, usability and security; prioritizing security over the rest when handling sensitive data. Considering the print management, often off-premise, many enterprises report at least one print-related security incident that led to data loss in the past year. This problem can damage the enterprise business, in particular considering the fines prescribed by current regulations or its reputation. Focusing on securing enterprise printing, pull printing is the set of technologies and processes that allow the release of print jobs according to specific conditions; typically user authentication and proximity to a printer. We design a software-oriented pull printing infrastructure that supports a print release mechanism using QR codes and electronic IDentity cards as a second-factor authenticator. Our solution addresses the costs, as any medium-size organization can adopt our open-source solution without additional devices or access badges; and the user experience, as we offer a driverless print environment and a user-friendly mobile application.Complementary Material
Our open source pull-printing solution is available at https://github.com/stfbk/pullprinting.
Architecture
To provide an open, flexible and secure pull printing service for enterprises, we decided to extend the capabilities of a Print Orchestrator with a multi-platform, printer-agnostic system that authenticates employees on a mobile application (Print Releaser); in case of sensitive documents, a second-factor authentication is performed with the eID card. The use of the eID cards (that we assume in possession of any employee) allows the enterprise to avoid issuing new smart cards or customize (if even possible) employee badges.

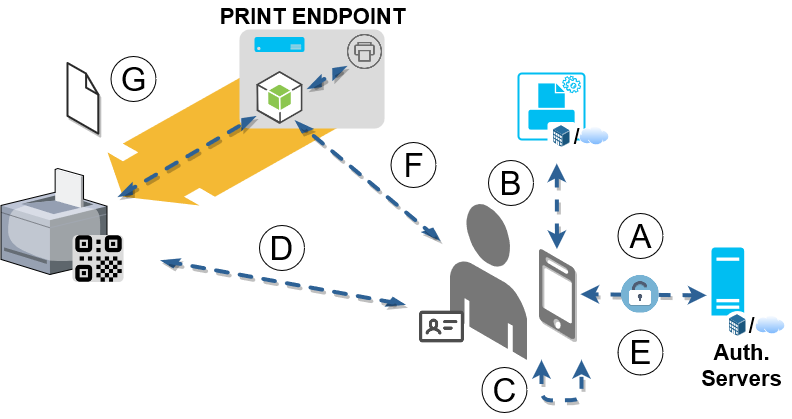
The figure above provides a high-level view of the architecture, which involves:
- Employees: users with their eID cards and enterprise accounts (managed on-premise or by external identity providers).
- IT Administrator: in charge of the pull printing service.
- Mobile Devices: NFC-enabled phone or tablet that will be used by employees to authenticate with their enterprise accounts, select and release print jobs on specific printers. Print Releaser provides all the functionalities. If printing sensitive data, employees are required to use their eID card to perform a second-factor authentication. The library to interact with eID cards can be integrated into Print Releaser or provided by an external mobile application (named ID Authenticator in our architecture).
- Print Endpoints: a virtual appliance with a Print Server (the backend of the service) and two Virtual Printers that queues employees sensitive and non-sensitive print jobs, respectively.
- Authentication Servers: endpoints responsible for authenticating employees with their enterprise accounts and eID cards. These functionalities can be directly managed on-premise or require the federation with an external authentication servers (e.g., Google).
- Print Orchestrator: a service configured with the enterprise (physical) printers and the Virtual Printers. It can be operated by the enterprise or outsourced.
Workflow
Employees enrol in the pull printing service by authenticating on a webpage with their enterprise account and accepting the service level agreement, or with the support of the IT Administrator. Then, they will receive an email with a link to install the Virtual Printers and, if employees do not use enterprise mobile devices, a link to download the Print Releaser and ID Authenticator applications on their smartphones.


Once the pull printing service is deployed and operating in the enterprise, enrolled employees can use the service to print data as reported in the figure above; where a lock indicates when employees need to be authenticated to perform the corresponding operation.
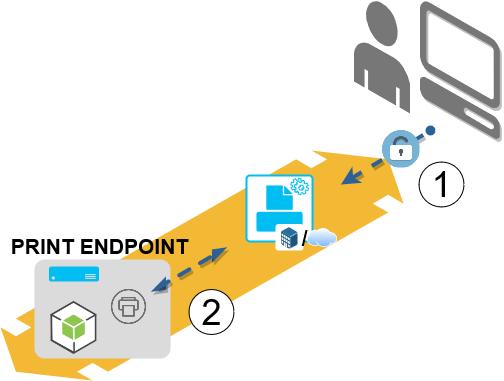
Initially (Step 1), an employee needs to authenticate with his enterprise account towards the Print Orchestrator and select one or more documents to print, and one of the two Virtual Printers (according to data sensitivity). The Print Orchestrator will send the print job(s) and the employee enterprise email to the Print Endpoint (Step 2); there, documents are queued.
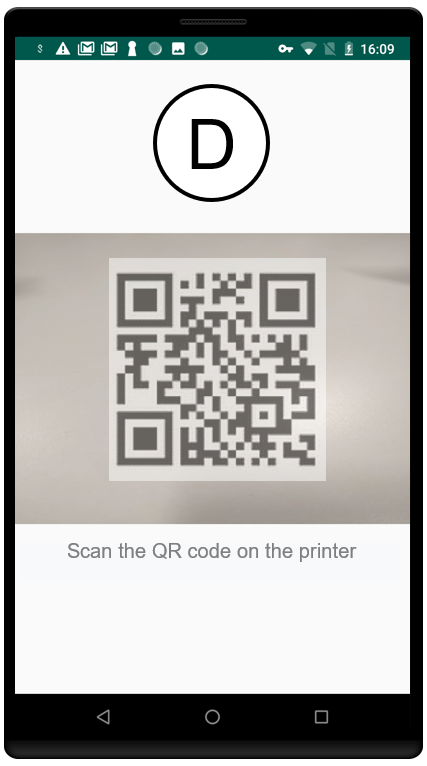
When the employee moves to the selected printer in the enterprise, he needs to open Print Releaser and authenticate (if not already) with the enterprise account (Step A); request the Print Orchestrator his pending print jobs (Step B); select one or more print jobs to release (Step C); point the QR code attached to the printer with the device camera and confirm the printer via its image in the pop-up notification (Step D); if printing sensitive data, he will perform the second-factor authentication with ID Authenticator and the eID card by inserting the security PIN and holding the card near the device NFC sensor when requested by ID Authenticator (Step E). As a result, an authenticated request is sent by Print Releaser to the Print Server (Step F). If the request is valid and authorized, the Print Server releases the print job on the selected enterprise printer and notifies the result to Print Releaser (Step G). Step D is also visualized on the right through a screenshots of Print Releaser in our prototype implementation - that leverages Google sign-in for performing Step A.
To support the cases where the QR code is missing or damaged, in Step D Print Releaser will attempt the reading for up to 10 or 60 seconds (depending on the Virtual Printer selected at Step 1); after that, it will fetch and show the list of enterprise printers.
Sequence Diagram
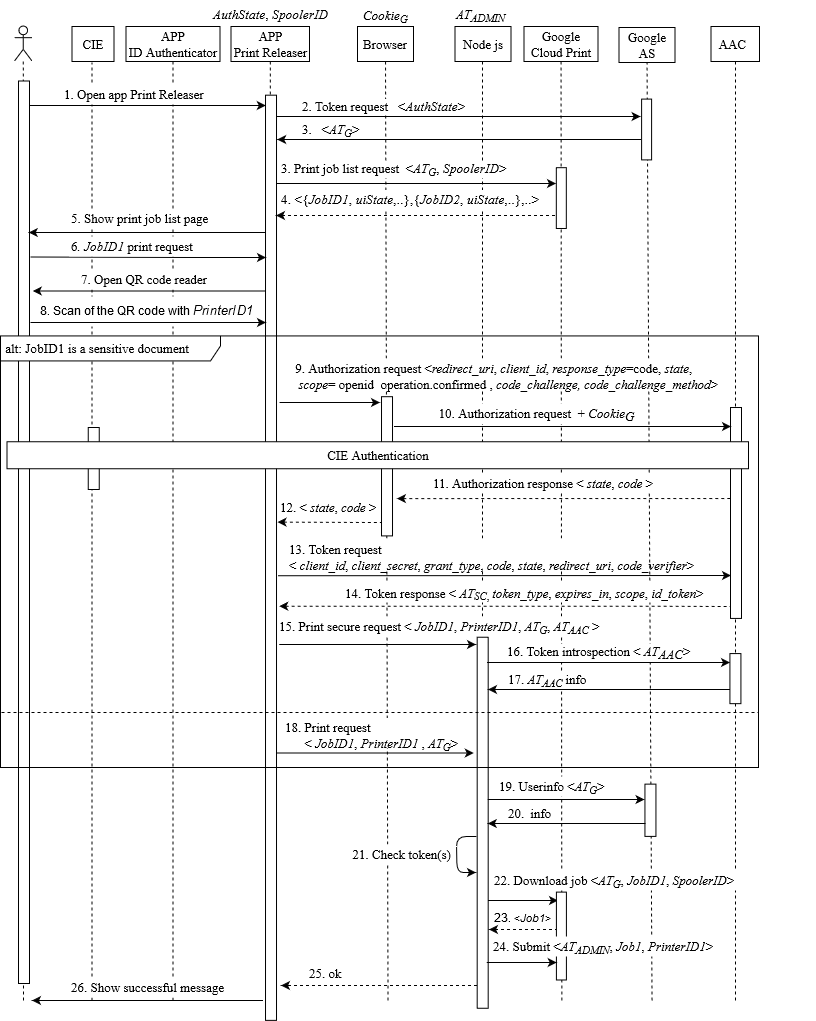
The figure below provides the messages exchanged as part of the workflow steps A-G for an employee who is already authenticated in Google (workflow steps 1-2) and is using the Print Releaser to release a job.

- (i.e., login with the enterprise account) is represented by Step 2 on the left. It corresponds to the check of a valid login session with Google (i.e. the presence of a valid Google access token ATG).
- (i.e., fetching of the job list) is represented by Steps 3-4. In the print job list request, the Print Releaser app sends the user token (ATG) and the identifier of the Virtual Printer (Spooler ID) to Google Cloud Print. As answer, it receives the list of the jobs (JobID1, JobID2,...) that the user has previously uploaded in Google Cloud Print together with other information (e.g., the job state).
- (i.e., selection of print jobs) is represented by Steps 5-6.
- (i.e., QR code scanning) is represented by Steps 7-8, where the QR code contains the identification of the physical printer the user is close to (Printer ID1).
- (i.e., eID authentication) only if JobID1 contains sensitive information, Steps 9-14 are performed. These steps represent the OIDC authorization code flow performed with the enterprise and the eID.
- (i.e., print request and token validation). If JobID1 contains sensitive information, Steps 15-17 are performed; otherwise, the flow continues with Step 18. In the former case, an additional token (ATAAC) is sent to the Print Server and, in Steps 16 and 17, its information is retrieved. In both cases, Print Server obtains the user info associated with the ATG token (Step 19-20) and checks (Step 21) whether the user is an Employee of the enterprise (by checking the email domain). If JobID1 contains sensitive information, Print Server also checks that the user authenticated with the eID is the same user authenticated with Google.
- (i.e., job submitting and notification) is represented by Steps 22-26. If the checks are valid, Print Server downloads the job by sending a request to Google Cloud Print (Steps 22- 23) and submits (Step 24) the job to the indicated physical printer by using an admin token (ATADMIN). As the final step, Print Server notifies the user of the successful printing (Steps 25-26).
Security Assessment of each component of the infrastructure
We developed and assessed our pull printing solution according to the following recommendations:
- Implement or enforce email filtering to prevent phishing attacks in the enrollment phase. The security of this preliminary step is essential to avoid that an employee configures an attacker Virtual Printer unknowingly or downloads a malicious mobile application.
- Restrict the pull printing service to enterprise accounts: the Print Server should operate in the local intranet and be accessible only from devices connected to the local wireless network. In addition, Virtual Printers should be visible only through the configured Print Orchestrator.
- Develop Print Releaser following the current security best practices (e.g., the Google developer ones, the OWASP TOP 10 Web Application Security Risks guidelines and the ENISA Smartphone guidelines tool) to protect employees mobile devices and their data. Especially if the enterprise is adopting the Bring Your Own Device strategy. Similar considerations apply for the development of the Print Server: for instance, following the OWASP Secure Coding Practices and its list of the ten most critical web application security risks.
- Assess the entire architecture from the security and privacy perspective; in particular if integrating third-party services.
- Require the use of TLS (v1.2+), implement the service as standalone on the host, and access it for configuration only via SSH Key-Based Authentication. Those measures protect the Print Endpoint against malicious employees and remote attackers that compromised the enterprise network.
- Limit the resources accessible by an employee through the pull printing service (e.g., using the OIDC scopes associated with the access token). This will prevent the possibility to access other enterprise services or perform privilege escalation attacks.
- Throttle the number of non-sensitive print requests to the Print Server by rate-limiting the source IP address to protect address. This protects the availability of the service.
- Allow the use of the authentication assertion (e.g., an OIDC access token) received after the second-factor authentication (for sensitive prints) in a limited time-window. By doing so, we limit the attack surface of a proximity attacker: if he/she gains access to an employee mobile device, the employee work credentials are needed to disclose pending print jobs; if the service is configured to support only secure printing, the proximity attacker will also need the employee eID card and its PIN.
- Add a pop-up confirmation notification in Print Releaser (e.g., Step D in the workflow) to avoid a proximity attacker to access employee prints by simply swapping the QR codes put on the printer.
- Investigate the security measures and trust of the eventually outsourced Print Orchestrator (it should not compromise the confidentiality of its users). Then, oversee those with privileged accounts that operate the network and the IT infrastructure (they should work safeguarding the confidentiality, integrity and availability of the pull printing service and employees data).
To reduce paper waste and reprints (therefore saving costs and preserving the environment), we also suggest to monitor the correct use of the pull printing service (e.g., by storing the print issuer, the number of pages and if B/W or colour).
The goal was to enforce that an attacker is not able to print on behalf of employees or covertly access their prints.
As a preliminary step, we registered the service in the enterprise Record of Processing Activities and created a privacy policy (with informed consent) that describes employees all data processing and security measures. Two important aspects of the policy detail the data shared with Google Cloud Print and our Print Server. The Google Cloud Print privacy notice reports that Google records endpoints and their status; it also stores a copy of the document to be printed until the print job is complete. Printed documents will also be stored in-memory by Print Server in the process of releasing it to the selected printer.
In the following, we delve into the security measures adopted or inherited (from the enterprise or Google) that protect our solution and employee data from a remote or proximity attacker.
Securing the enrollment phase. By adopting the Google Suite, each enterprise employee has automatic access to the Cloud Print service. However, they are not able to interact with the Virtual Printers unless enrolled. We ensure that an attacker with access to an Employee device (proximity or remote) is not able to enrol as the employee by requesting the authentication with enterprise credentials. As part of the Google Suite, software - or hardware-based second-factor authenticators can be adopted to prevent credential brute-forcing or stuffing. Finally, we rely on the Google Suite email filtering to prevent phishing attacks when sharing the Virtual Printers with employees via email as required by the enrollment phase.
Securing the backend. We adopted the suggestions from the OWASP TOP 10 Web Application Security Risks guidelines as follows:
- As part of the TOP 1 (Injection flaws), we strengthen the input validation and fuzz-tested the endpoints with OWASP ZAP to assess the possibility to disrupt the service. Suggested static and dynamic automatic testing will be integrated into the CI/CD pipeline when publishing the code on GitHub.
- As part of the TOP 2 (Broken authentication), we rely on the Google CAPTCHA protection to prevent credential stuffing and brute-forcing (increasing delays on failed login attempts are not supported), and to the Google session handling. The enterprise is responsible for the password criteria and to limit password reuse or selecting weak passwords. The backend has been verified for hardcoded credentials and is not provided with default ones. However, once the service is configured according to provided guidelines, it will hold inmemory the administrator OIDC tokens: a scoped access token and a refresh token. As mentioned in the recommendations, access to the backend is restricted to enterprise IT department and the trusted administrator (via SSH with key-based authentication), and employees authentication can be further protected by adopting one of the Google second-factor authenticators.
- As part of the TOP 3 (Sensitive Data Exposure), we enforce TLS 1.2 with a secure cypher suite on all the Print Server endpoints and implement the HTTP Strict Transport Security (HSTS) headers. Encryption is not addressed as we do not store data on the disk.
- As part of the TOP 5 (Broken Access Control), we verified each endpoint for missing or malformed parameters. By-design we prevent privilege escalation attacks: Google enforces that an employee has no visibility on other employee print jobs, and we prevent the possibility to receive different access scopes from the authorized one when requesting an access token for sensitive prints; then, the service is restricted within the enterprise, and each endpoint (except the one to provide the printers list) requires one or two valid access tokens. The (trusted) administrator is the only entity able to access all the print spoolers print jobs. To prevent possible service disruptions, we limit the number of requests received by the Print Server with the express-rate-limit Node module (IP-based).
- Following the TOP 6, when evaluating the service for configuration issues or data leaks, we port-scanned the VM and reviewed all configurations, available account and software: only SSH (port 22) and HTTP (port 80 and 443) are exposed, while the Cups web interface (port 631) is accessible only from localhost. The (trusted) administrator is the only SSH-enabled identity (other than native enterprise IT department accounts). The proxy server (Nginx) that mediates the communication between the app and the Print Server connects with TLS 1.2 and implements the supported HSTS security headers. As the enterprise IT department is responsible for updating the OS and apply security patches, we focused on verifying the adoption of the latest NodeJS version and modules; updates are monitored via CVEs subscriptions and with Github alerts. Although OWASP suggests a complete separation of the development and production environment, it is not possible to assign another account to each employee: the enterprise and the current regulations do not allow multiple credentials or identity cards associated with the same entity.
- Following the TOP 9, we cleared any log or error message from sensitive data; the latter only provides the response state. As suggested by OWASP, we segmented the Print Server code (according to functionalities), removed any unnecessary file and comment, and reviewed the code execution flow to avoid possible attacks (such as race conditions).
- Following the TOP 10, we coordinated with the enterprise IT department to manage logs: they monitor the VM with alerts associated with performance metrics while we log the use of the service from authorized Employee. As future work, we plan to integrate API call metrics (number and response time) by connecting Nginx with a Grafana instance.
OWASP TOP 4, 7 and 8 were out-of-scope considering the handling of JSON data (rather than XML) and the Print Server specifics: single-service with robust input validation; no database, cache or cookies. We further verified the security of the backend with two source code analysis tools: Insider, and Semgrep. Most of the warnings related to possible data leakages (mainly hardcoded URLs) and vulnerable code snippets: outdated Hash algorithms and components that might enable arbitrary code execution. We verified that the latter are imported with the required Node modules but are not part of the execution flow.
Securing the frontend. We adopted the recommendations from OWASP and Enisa guidelines as follows.
We initially identified all the assets and reviewed their storage to protect all sensitive data at-rest from a proximity attacker with access to the employee device. To foster the usability of Print Releaser, we decided to persist the authentication of the employee towards the Google Suite after the first login. This allows an attacker with access to the unlocked device the possibility to (only) list pending print jobs and, eventually, print the non-sensitive ones. The second-factor authentication with eID protects the jobs tagged as sensitive: the one we use limits by-design the number of authentication attempts to three; afterwards, the PUK code is required (10 possible attempts before blocking the card). We also configured the received access token to last only for 30 seconds. Even if an enrolled attacker registers his eID on the employee device, the service would recognize (server-side) the mismatch between the identity card and the enterprise account, and prevent the print request. This control is part of a series of security checks introduced to prevent the tampering of the employee device from a proximity attacker; e.g., brute-force authentication with the device configured in offline mode.
The OAuth configuration, containing the client secret, is hardcoded as a JSON object. This is typically a security issue, as the static client secret value can be easily extracted from mobile applications and used by other applications to impersonate the legitimate one. However, the client secret value is not used to authenticate Print Releaser; it is only required for backward compatibility with the enterprise services.
As additional measures, Print Releaser is configured to prevent backups and verify if the device is rooted; if so, it warns the employee and prevents its use. We believe this mechanism to be in line with OWASP TOP 2 (data storage controls), TOP 8 (anti-tampering mechanisms) and the use of a mobile application in an enterprise environment.
To protect data in transit from attackers with access to the enterprise network, we enforce certificate pinning and support only TLS (1.2) communications.
To improve code quality (TOP 7), we performed a manual code review and took advantage of the suggestions from the Android Studio lint tool, such as remove unused resources and resolve layout inconsistencies. As also suggested in TOP 10, particular attention has been dedicated to configuration files, test code, data-leaks in comments or logs, and to verify that the app is not packaged with additional permissions, testing features, backdoors or the possibility to disable security controls.
No reverse engineering mechanism has been adopted (TOP 9) since the code will be hosted in an open Github repository.
Finally, as the attacker might attempt to inject data in the Employee mobile app by crafting a QR (and placing it near the printer), we validate the data read by the camera and also provide a pop-up confirmation window with a picture of the printer.
We further verified the security posture of Print Releaser with MobSF16 and APPROVER. The use of APPROVER confirmed the adherence to the OWASP guidelines, while MobSF was essential to further investigate permissions, exported components and the release requirements (such as remove debugging and limit logging).
Performance evaluation
To measure the performance of our pull printing deployment, we simulated the use of the service in a medium-sized enterprise with Apache JMeter version 5.3. We estimated that up to 50 employees would be concurrently printing on the same physical printer in the worst-case scenario and measured all the request times from the Print Releaser perspective.

The figure presents the boxplot of ten measures (testing data is available here): the releasing of sensitive and non-sensitive print jobs to the enterprise printer by one employee, and by 10 to 50 concurrent employees (in 5 steps).
When printing a document, the processing time of Print Server accounts for the verification of the request towards Google (as employee accounts are operated with the Google Suite) and AAC (if using the second-factor authentication), the fetch of the document from one of the virtual spoolers (via Cloud Print) and the printing on the selected printer: when printing a non-sensitive single-page PDF document, it takes up to ∼ 28s when serving the slowest request of the 50th employee and (only) 7.3s for the faster one.
This is partially due to the resources allocated to the Print Server and the handling of the print jobs via Cloud Print queues; but also to the printer performance (sleep mode and time to wake-up, wiring and prints per-minute) and the latency accumulated along the route from the employee device to the Cloud Print servers and from those to the enterprise endpoints.
When sending a sensitive document print request (Secure print), there is an overhead on the median times of 22% in case of a single request but 11% when serving 50; with 30 and 40 employee requests are slightly faster (1.3% and 5%, respectively). This transition between positive and negative overheads highlights how marginally the additional security controls (Steps 16, 17 and 21 in Sequence Diagram) affect the overall latency of requests.
When using Print Releaser, we verified that from the opening of Print Releaser it takes on average ∼ 12s to print a non-sensitive document and ∼ 27s to release the print of a sensitive one by performing the second-factor authentication with his eID and ID Authenticator. Although we believe those results to be consistent with the type of service, the benefits for employers and the additional guarantees provided by the print-release mechanism and the second-factor authentication, we notify employees the estimated waiting time on Print Releaser (fetching the printer model and status) and are currently working to optimize the code to better support peak loads.
Deployment
- To operate the pull printing service, the enterprise needs to employ the Google Suite platform to handle employees accounts. This is a typical choice in enterprises that do not have the expertise or the means to host an email server and, in addition, it will automatically grant employees the access to the Google CloudPrint service.
- The enterprise needs also to operate an OIDC server with a module that supports the second-factor authentication via eID cards.
- Finally, an IT administrator needs to deploy the Print Server on a host reachable from the enterprise network and configure the mobile applications in the Google developers console at https://console.developers.google.com.
- A step-by-step tutorial is available at https://github.com/stfbk/pullprinting.


